Saturday, January 29, 2011

January 12, 1863

Today's block is titled, "Battle of Springfield"  I worked on it late last night which maybe wasn't the best choice on my part since I was tired.  "Jack the ripper" was used a couple of times to correct boo-boos.  Overall I'm very happy with how the block turned out.  So follow along with me to see how I constructed this block...


I picked out fabric to match how the block is presented in Rosemary Youngs book, The Civil War Diary Quilt....

My drafted patterns... if you are drafting your own patterns to work from for your blocks, remember to make a copy so that you have the original to work from in case you make a mistake.  The center star is broken down into five paper piecing sections.  I did a combination of paper piecing and cutting  blocks to size to construct this block....

Paper piecing the center star...

My center star is pieced.... remember to square it up to size if needed...

Remember to trim up your paper pieced blocks, leaving a 1/4" seam allowance....


 I paper pieced the center star and the side triangle blocks...  cut two 1 1/2" x 2 5/8" blocks out of the pink fabric for the side pieces that fit next to the star block in the center of the squares.   To form the 4 corner red triangles, cut 2 4" squares out of the red fabric, then cut in half from corner to corner, sew onto the corners then square up to measure 6 1/2"
Your block is complete!
 To learn more about the 1st Battle of Springfield, which was fought January 8th, 1863,  I found this website;
Battle of Springfield

Next week I will be working on "Hungry Soldiers" and "Dark Gloom" A trip to the fabric store is on the to do list since I don't have a yellow or dark purple in my Civil War fabric stash....

I have been so lucky to be able to exchange emails with the author, Rosemary Youngs over this last week.  She is a generous quilter... I've enjoyed visiting with her very much!  To order her book, The Civil War Diary Quilt Book you can contact her directly.  She also has a CD companion to go with the book.  You need to have EQ 5 or 6 installed on your computer to run the CD for the foundation piecing patterns. 

The Civil War Diary Quilt Book can be bought through paypal or through the mail from Rosemary Youngs...
The Civil War Diary Quilt book is available for $22.99 plus $4.95 priority mail, (global priority mail $11.95) . You can order the CD with the book, you will need  Electric Quilt 5 or 6 to run the CD, the CD alone is $10 and there is no extra charge for postage when you order the book with the CD, total cost for the CD with the book will be $32.99 plus your postage.
Send a check or money order to Rosemary Youngs, 3704 Nicole Ct., Walker, MI 49534

Remember to post your progress on the Civil War Diary Quilt Group on Flickr
http://www.flickr.com/groups/1547598@N25/

Happy quilting!

Sunday, January 23, 2011

Rachel's Frustration & Special Blessings

I worked on two blocks this weekend from Rosemary Youngs book, The Civil War Diary Quilt.  (Rachel's Frustrations & Special Blessings)Paper piecing was the way to go for 'Rachel's Frustrations'.  I traced my block out the way I thought it should go together and while sewing away on the center section I realized I was tackling this block wrong... argggg... needless to say, I was frustrated.  But, I continued on and made it work.... then to add to my frustrated state, I realized my light and dark triangles on the center section were reversed.  Not my best sewing day, but I have decided that I really like the block as is and will not redo this one.  The overall pattern still works.  So here is how I tackeled the block minus my frustrations....

I choose colors similar to what is shown in the book out of my Civil War stash, I traced my paper piecing pattern using the square lay-out in the book...

Here is my paper piecing pattern broken down into each section that I will sew. I broke the block into  six sections as shown, I numbered each section in the order  that I will complete the design and also wrote the fabric color in each 'block'. Refer to the book for color placement.  I made a copy of my paper piecing pattern in case I made a mistake, as least it wasn't on the original that I traced.  Don't forget to trace your 1/4" seam allowance around your paper piecing blocks. 

Notice how I sew on the drawn lines and I sew 'pass' the seam line... In this picture is shows my big mistake in breaking down the block.  I did the center piece all  in one block.  It really needs to be broken down into two halves as shown in the previous picture.

 When you are done paper piecing each section, trim the block... remember to leave the 1/4" seam allowance!  Then match up your seams and sew  your block together.

Remember to sew on the 1/4" seam line...

Rachel's Frustration block all done!  I decided that it's OK to have the light and dark reversed in the center.  Sometimes we live with our 'happy' mistakes.

Now onto 'Special Blessings', I found that this block would be easy to do with a cut and sew method.  I again picked out fabric matching the color choices given in the book.
Rotaty Cut the following;
1   2 1/2" white square
2   2 1/2" green squares
3   3" green squares
3   3" red squares

Pair up one green 3" square with one red 3: square with right sides together.  (You will have 3 pairs) Draw a line from corner to corner on each pair.

Sew a scant 1/4" seam on each side of the line.  Cut the triangle sections apart and iron.  Trim each block to measure a 2 1/2" square.   You should have 6 triangle squares all together.

Lay your block pieces as shown following the placement in the book...

Sew your block together, remember 1/4" sewing seam.

Special Blessing all done!
Next Saturday I will work on 'Battle of Springfield'  from the book....if you have any questions or comments on the block, feel free to email me at cindy

Remember to post your progress on the Civil War Diary Quilt Group on Flickr
http://www.flickr.com/groups/1547598@N25/

Happy quilting!

Saturday, January 22, 2011

Civil War Saturday and a Mug Mat...

Last night was the Friday Night Sew In with Heidi... I worked on a snowman mug mat that I have had drawn up since Christmas.  Which I guess is fitting since we will be celebrating a be-lated Christmas with my in-laws next weekend.  (Then the Christmas wrapping paper box can go back in the closet!)  I'm in love with my mug mat and can't wait to put it on my desk at school on Tuesday.  It will be so cute!  I will be offering the pattern for it on my Etsy site... it will be a PDF downloadable pattern.


Today is Civil War Saturday and I will be working on two blocks from Rosemary Youngs book, The Civil War Diary Quilt... 'Rachel's Frustrations'and 'Special Blessings'.  I invite you to join me as I work on this special quilt.  It's early in my journey... I will be posting how I completed these two blocks tomorrow since last night was the FNSI for this month.

Happy quilting and perfect stitches to you!
Cindy

Sunday, January 16, 2011

Civil War Saturday! September 9, 1862

Well, it's been a very busy weekend and I apologize for the late Civil War Saturday post... I was re-elected to take a group of boys to Afton Alps for a day of skiing/snowboarding with the Boy Scout Troop.  Well, can't take my sewing machine with so I settled with bringing my Civil War Diary Book and drafting supplies, aka pencil and ruler.  Several hours of freezing my tootsies off in the chalet and tons of coffee and Mountain Dew later, I got the next 10 blocks drafted and ready to go.  So it was a productive day, just not working on the block I was planning to blog about.  AND since I wasn't going to give up on the block, I worked on it Friday night until 1:00 am and just finished it now, Sunday evening.  I pondered about doing this block and came to the conclusion that even though it looks extremely difficult, that if paper pieced, it wouldn't be so bad.  (There's 65 pieces to this little block)  So here is how I completed the block 'Anxieties' from the Civil War Diary Book...


Trace the block in three sections as shown, I numbered each section in the order  that I will complete the design and also write the fabric color in each 'block'. Refer to the book for color placement.  I made a copy of my paper piecing pattern in case I made a mistake, as least it wasn't on the original that I traced.  Don't forget to trace your 1/4" seam allowance around your paper piecing blocks.


My three paper piecing sections for this block, all ready to start!
 

If you need a refresher coarse on paper piecing,
I found this website helpful...
Remember to finger press as you sew each section...
 
Remember to sew on the drawn lines and to sew past the edges of the section you are working on.  Whoopsies I held the block I was working on up-side down for the picture! The picture also shows how I number the segments to show the order for paper piecing the block.
Two sections done and one more to go!  When you are done paper piecing each section, trim the block... remember to leave the 1/4" seam allowance! 
All done!
 Next Saturday I will work on 'Rachel's Frustrations'  and 'Special Blessings'  from the book....if you have any questions or comments on the block, feel free to email me at cindy

Remember to post your progress on the Civil War Diary Quilt Group on Flickr
http://www.flickr.com/groups/1547598@N25/

Happy quilting!


Friday, January 14, 2011

Tomorrow is Civil War Saturday...

Tomorrow is Civil War Saturday, hope that you are able to join me in my journey as I work on my civil war quilt.  Civil War era quilts are rare... is that why I am so fascinated with them?  I spent the evening reading about the Jane Stickle quilt, looking at pictures, marveling at her workmanship, how long did it take her to make the quilt.  5602 pieces, none of the blocks repeat, nor does any of the fabric repeat from block to block.  Fabric was scarce in the south during the Civil War.  Here I sit in present time with a room full of fabric and choices recreating a Civil War style quilt. Something to think about.

During the Civil War  the military requested that quilts for the soldiers measure seven by four feet so they would fit on a cot.  I read that over 250,000 quilts were made for the union soldiers.  Very few of these quilts survived, they were put through a good deal of use, they wore out.  Also, many soldiers were buried with their quilt.  To make your very own Civil War Soldiers Cot Quilt I found this link for a free pattern.


Tuesday, January 11, 2011

Jam Filled Muffins

Makes one dozen
Jam Filled Muffins

2 cups flour
1/2 cup white sugar
3 teaspoons baking powder
1/2 teaspoon salt
1/2 cup vanilla yogurt
1/4 cup milk
1/3 cup vegetable oil
1 egg
1 teaspoon vanilla

raspberry jam
sliced almonds

Mix dry ingredients in a bowl, in a different bowl, mix all or your 'wet' ingredients' Add dry ingredients all at once; stir just until dry ingredients are moistened (batter will be lumpy.) Fill muffin cups 2/3 full.  Place 1 teaspoon raspberry jam on each muffin, sprinkle tops with sliced almonds.  Bake at 400 for 18-20 minutes or until toothpick inserted in center comes out clean.  Serve warm...

Sunday, January 9, 2011

'Anxieties'

Next Saturday I will work on 'Anxieties' from the book.... it looks like another paper piecing block to me.  I will again break it down and show how I completed the block.  Feel free to join me if you are working on a Civil War Project!  We can help encourage each other along and we go. 

Remember to post your progress on the Civil War Diary Quilt Group on Flickr


So you wonder what happened to those 4 extra blocks from my 'Conscript Law' block.  Well I made a cute little pincushion.  I never have too many of those laying around my sewing room.

Happy quilting!


3 done so far!
 

Saturday, January 8, 2011

Civil War Saturday!

It's Civil War Saturday!  I have been working on Alarming Conditions on page 12-13 and Conscript Law on page16-17 from the book The Civil War Diary Quilt book by Rosemary Youngs.  I used a different technique for both squares.  I paper pieced 'Alarming Conditions' and did a 'cut and sew' for Conscript Law....

Let's start with Alarming Conditions.... I followed the colors as what is shown in the book.  A dark brown, pink and cream. 


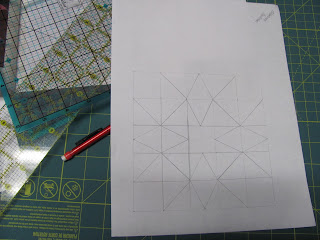
First, trace the lines of the pattern right out of the book, make several copies (I make extras in case I make a 'boo-boo')


Break the square down as shown into sections and draw 1/4 seam allowance around each section.  (1st row, 3rd row (two sections) and  5th row)   You are creating the paper piecing blocks to complete this square.

One a second copy of the pattern draw a 1/4" seam allowance around the 2nd and 4th row of the pattern. 

Cut your pattern piecing sections out as shown, do not cut on the edge of the 1/4" seam, your sections will be trimmed up later when each section is done.  Cut a 1 3/4" pink square (or color of your choice) for the center.  It may be helpful to write the colors or number your colors and write this in each section of your paper piecing sections.  I spent a lot of time referring to the book and checking and double checking as I worked on each section.

Since it had been awhile since I did paper piecing, I needed a refresher coarse and
I found this website helpful...

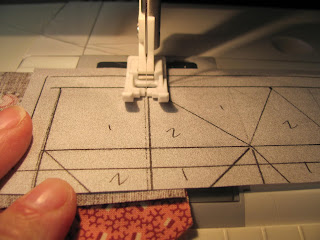
sewing along.... remember to sew on the drawn line....
finger pressing as I go....
Notice my seam lines and that I sew past the margins of the block...
When you are done paper piecing each section trim the block... remember to leave the 1/4" seam!


Sewing the rows together...
The finished block, it measures 6 1/2" including seam allowance.

The next block that I worked on is called 'Conscript Law'.  I constructed this block using a cut and sew method to form the triangle units... I again followed the color choice laid out in the book. 

Let's get started...
Cut 6 green 2 1/2" squares
Cut 6 Pink 2 1/2" squares
Stack 1 pink and 1 green, right sides together in pairs.

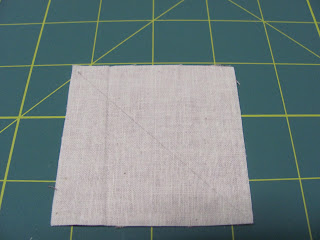
Draw a line in pencil from corner to corner...

Sew a scant 1/4" seam on each side of the line...
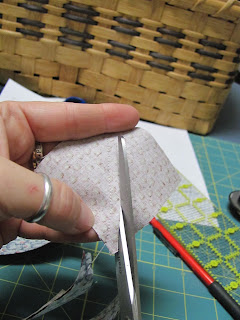
Cut apart and iron

Square and trim up to be a 2" square... you should have 12 of these blocks.
Now lets make the 4 center squares... you will need to cut;
4    2 1/4" green squares
2   2 1/2" pink squares
2   2 1/2" white squares

Make 2 pairs of a pink and white square with right sides together.  Draw a line from corner to corner in pencil.

Sew a 'scant' 1/4" seam on each side of the line on all 2 pairs.

Cut apart & iron.

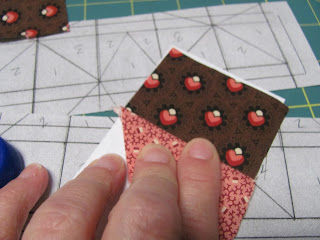
Pair together one pink & white triangle square with a green square, right sides together.  Draw a pencil line from corner to corner as shown in the picture.

Sew a 'scant' 1/4" seam on each side of the drawn line.

Cut these sections apart and iron.

You will only need 4 of these sections to make the white pinwheel in the center.  Only 4 of them will work... you will have 4extra blocks.  I'm going to make a little pin cushion out of mine.

Lay the blocks out following the placement either pictured here or in the book.  Sew together.
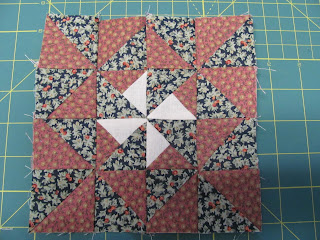
Whoo Hooo another block finished!